For maps relating to the Article below please click HERE
The
advance down the Pangani River
In March 1915 the enemy commander,
Colonel Paul von Lettow-Vorbeck, had briefly contested the British advance into
German East Africa at Latema-Reata Nek, and then had withdrawn to Kahe on the
Usambara Railway line that ran from Moshi to Tanga on the Indian Ocean
coast. In the Kahe area the Germans
fought defensive actions that allowed them to break contact with the British
advance and withdraw down the railway line.
Heavy seasonal rains fell during April and the British under the South
African General Jan Smuts stayed north of the Ruwu River, occupying high ground
whenever that was possible.
During the rains the South African
mounted troops under Major General J.L. van Deventer made an epic and muddy
trek from Arusha south-westwards to seize Kondoa Irangi, but the remainder of
the British force, now reorganised into the 1st British Division,
stayed ready to advance south down the Usambara Railway line and the Pangani
River valley.
In late May this advance started. The Divisional Commander, Major General A.R.
Hoskins, a former Inspector General of the King’s African Rifles, organised a
River Column, a Centre Column and an Eastern Column; the latter column moved
cross-country from Mbuyuni in British East Africa. The Centre Column followed the railway track
towards Tanga whilst the River Column, commanded by Brigadier General S.H.
Sheppard DSO RE, marched down the Pangani River.
The Loyal North Lancashire Machine Gun Company (LNL MG Coy) formed part
of the Divisional Reserve and marched many kilometres behind the leading
elements of River Column.
The
advance to the Lukigura River
Unfortunately the War Diary of the LNL MG
Coy has not survived and the engagements of the Company have to be interpreted
from other sources. Initially the
Company marched down the Pangani River, sometimes having to cut trails through
the bush for the 40 mules and 620 African porters. Mules were fed 10 grains of Arsenic each day
as a prophylactic to counter tsetse fly disease, and the men received quinine
when it was available to counter malaria.
Because of General Smuts’ inability to plan for logistics, on most days
only half-rations were issued and this measure often dropped down to
quarter-rations. Consequently the
Company was constantly losing men who were medically evacuated under
rudimentary conditions to be treated for tropical diseases and debilitation.
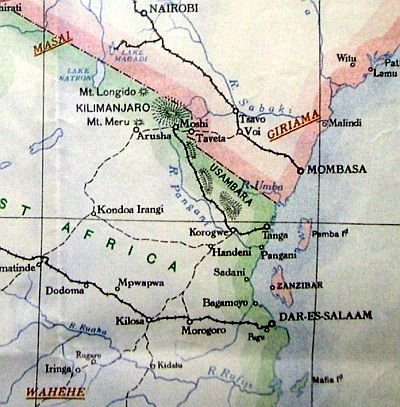
Right: Map of the LNL MG Coy area of operations
Having reached Mkalamo on the Pangani
River the Company followed the British advance southwards down a German
hand-powered trolley line to Handeni.
The enemy had used this line to move supplies away from the British
advance and towards the Central Railway that traversed German East Africa from
Lake Tanganyika to Dar Es Salaam on the Indian Ocean coast. From Handeni the enemy had marched
south-westwards to the Lukigura River; here Hauptman Doring and his men were
dug into a defensive position. Doring had under his command the 1st Field
Company and the 5th and 7th Schutzen Companies, these
latter two companies consisted of European former members of shooting clubs
that had been part of the German military reserve system.
The
fight at the Lukigura River, 24th June 1916
British ground and air reconnaissance
reports confirmed Doring’s defensive positions, and General Smuts seized an
opportunity to outflank and get behind his enemy. A special mobile column was formed under
Major General Hoskins. This column
contained
•
The
25th Royal Fusiliers (Frontiersmen) •
The 2nd
Kashmir Rifles •
The 5th
and 6th South African Infantry battalions •
The
27th Mountain Battery, Indian Army, less one section (two guns) of
its six mule-packed 10-pounder screw-guns •
The
Loyal North Lancashire Machine Gun Company.
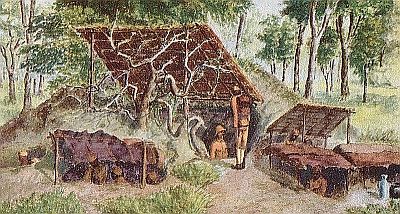
Above: Schutztruppe machine gunners and porters practise their drills
The mobile column was to turn the enemy’s
left flank whilst Brigadier Sheppard’s column ‘demonstrated frontally’ by
engaging Doring to hold him in place.
This frontal column contained:
•
the
29th Punjabis, •
the
130th Baluchis, •
the 2nd
Rhodesia Regiment, •
the
East African Squadron of the 17th Cavalry (Indian Army), •
the
King’s African Rifles Mounted Infantry Company, •
No 5
South African Field Battery (four 13-pounder horse-drawn guns), •
No 8
Field Battery (six 12-pounder ox-drawn guns, manned by white and mixed-race
Volunteers from India), •
two
armoured cars of No 1 Light Battery.
All of the units in both columns were
under-strength due to medical evacuations.
The mobile column set off on a 50
kilometre march on the evening of 23rd June 1916. For rations the troops had been issued with
biltong – sun-dried strips of meat from game animals that had been shot for
food. Hoskins halted his column from
midnight to 0300 hours and then, as dawn broke, he crossed the Lukigura River
at Kwa Negero unopposed, although his troops were by now exhausted.
Meanwhile at 0700 hours on 24th
June Sheppard’s armoured cars came into contact with a German outpost. The cars pushed forward towards the bridge
over the river but attracted heavy rifle, machine gun and pom-pom fire; one car
was disabled but the crew gallantly recovered it to a safe position. Sheppard’s advance guard then deployed and
engaged the enemy whilst his field batteries came into action; this part of the
plan worked and attracted the attention of the Germans.
Just before noon Hoskins’ advance guard,
the Gurkhas and Dogras of the Kashmir Rifles, spotted some of Doring’s men on a
ridge; the Germans withdrew onto a higher ridge named Kwa De Rema. The Kashmiris deployed to attack but
hesitated. Then two of the LNL MG Coy
machine guns came into action delivering supporting fire and the Frontiersmen
of the 25th Royal Fusiliers charged forward, taking the Kashmiris
with them. The charge went straight up
to and into the German trenches where bayonets plunged and kukris swung
ferociously as men frustrated by long months of hardly seeing their enemies
finally came face to face with them.
Doring’s men now swiftly evacuated the position but had to run through a
gauntlet of fire from the sepoys of Sheppard’s 29th Punjabis who
were waiting for them by the river.
The Indian mountain gunners joined in the
Fusiliers’ charge but the two South African battalions did not
participate. Four dead Germans and 30
dead Askari were found after the action.
Hoskins’ column captured 14 Germans, 20 Askari and the enemy machine
guns plus a field gun. Sheppard’s column
captured 7 Germans and 12 Askari. German
heavy naval guns recovered from the sunken cruiser Konigsberg now shelled the British force, but did not cause
casualties. British casualties were 6
killed and 26 wounded ( 3 of the dead and 15 of the wounded were Royal
Fusiliers) in Hoskins’ mobile column, and 4 killed and 10 wounded in Sheppard’s
frontal column.
Left: A British armoured car in East Africa
When firing at Lukigura commenced several
mules belonging to the LNL MG Coy bolted.
One mule, carrying a machine gun, was lost completely in the bush,
despite the troops searching for it for three days. Doubtless the weary mule soon became a victim
of the animal predators that stalked the bush.
During the Lukigura River action one
other unit manned by men of the 2nd Battalion the Loyal North
Lancashire Regiment participated. This
was the Mounted Infantry Company commanded by Captain G.P Atkinson MC. However this company needed
reinforcing because of the loss of men through sickness. When new recruits could not be found it was
decided to disband the Mounted Infantry Company. George Atkinson was attached to the 17th
Cavalry East African Squadron, a few of his men went to signalling or
intelligence duties, and the bulk of the remaining 30 or 40 men were posted to
the LNL MG Coy. This injection of fellow
Lancashire Lads boosted the LNL MG Company’s dwindling strength.
Due to the inadequate logistical staff
work already mentioned, the 1st Division was now out of
supplies. A short move forward of 12
kilometres was made to the Msiha River where the British troops dug themselves
in until the supply situation improved.
Rations remained short on the Msiha, no forage was issued for the mules
and there were no new clothing issues for the men, many of whom now wore ragged
garments. Several weeks would pass
before mail was received. This location
gained the name of Shell Camp because it regularly attracted the attention of
the German naval gunners. British
aircraft could not locate the German guns, and the British artillery on the
Msiha River did not have the range to engage the enemy gunners. On 2nd August 1916 4760 Company
Sergeant Major Thomas Nelson of The Loyal North Lancashire Machine Gun Company
was killed by shellfire on the Msiha River.
The
fight at the Wami River, 17th August 1916
The Germans then fought skilful delaying
actions southwards through the high Nguru Mountains. General Smuts had been reinforced from South
Africa and a third British Division was now in the field; all three divisions
were manoeuvred to try and trap the Germans on the River Wami. But von Lettow was too wily for Smuts, whose
South African horsemen were losing mounts daily to tsetse fly.
Eventually, on 17th August
1916, a battle was fought along the northern bank of the Wami. The new 3rd Division of South
Africans, reinforced by the 130th Baluchis and a section of the 27th
Battery, Indian Army, attacked from the west.
Their opponent was Abteilung (formation) Schulz which consisted of the 4th,
9th and 21st Field Companies, with the 13th
Field Company and the Wangoni Company held in reserve. Schulz’s men gave little ground and effective
German machine gunnery kept the parched British troops away from the river
water that they desperately needed.
Three German machine guns were silenced by a mountain gun of the 27th
(Bengal) Mountain Battery that was manhandled forward; the gunners escaped
serious wounds because of the steel gun shields that had been improvised and
fitted in Nairobi.
From the east Sheppard advanced with the
29th Punjabis, 2nd Kashmir Rifles and one company of the
2nd Rhodesia Regiment; deployed in support were the 17th
Cavalry East African Squadron, the 5th Battery South African Field
Artillery and four guns of the LNL MG Coy.
But Abteilung Stemmermann consisting of the 14th, 18th
and 22nd Field Companies was waiting and ready. The Punjabis ran into a heavily defended
position along a tributary of the Wami River and the British advance was
halted. The LNL MG Coy guns came into
action and the Rhodesians moved forward to reinforce the Punjabis, but every
British outflanking attempt was countered by an effective German counter
move. In this type of fighting the
defence had the definite advantage as water and reserve ammunition would have
been already stockpiled near the forward trenches, and reserves could be kept
at rest to the rear until British out-flanking attempts were observed.
At around 1500 hours the Kashmiris
relieved the Punjabis but then firing died down, and by 1700 hours British
scouts reported that the enemy position had been evacuated. The two-pronged British advance had resulted
in the Germans abandoning the north bank of the Wami River, but the planned
cutting-off of a sizeable number of enemy troops had failed. Von Lettow’s Schutztruppe withdrew towards
Morogoro on the Central Railway unmolested because the British logistics system
had broken down again; Smuts’ men were halted for three days whilst supplies
caught up with them, and whilst pioneers bridged the Wami.
The
advance towards the Mgeta River
A successful British general advance was
now made onto the Central Railway. The
South Africans to the west had to fight some sharp actions in hilly country,
but the British on the east occupied Morogoro without a fight. On the coast Dar Es Salaam had been seized by
a British seaborne landing whilst Belgian Congolese troops were advancing
eastwards down the railway line from Kigoma on Lake Tanganyika. The British supply system was now facilitated
by shipments into Dar Es Salaam harbour which were then sent up the Central
Railway to Morogoro and beyond. The only
problem was that the Germans had dropped the big railway bridge over the Ruvu
River, but the British improvised by running separate trains from each bank of
the river whilst a new bridge was constructed; the supplies were boated over
the river from one train to the other.
Casualties could now be evacuated down the railway line from medical units
at Morogoro to a Hospital at Dar Es Salaam, and before long a hospital was also
located at Morogoro.
South of Morogoro lay the Uluguru
Mountains, and von Lettow’s men made fighting withdrawals through the hills and
down each flank of them. New troops from
West Africa had arrived and the Gold Coast (now named Ghana) Regiment was used
to advance through the mountains. An
ORBAT (Order of Battle) dated 23rd August 1916 lists the LNL MG Coy
as now being part of the 2nd East African Brigade of the 1st
British East African Division. The brigade was commanded by Brigadier General
J.A. Hannyngton. Other units in or
attached to the brigade were:
•
the
57th Wilde’s Rifles, •
a
half battalion of the 3rd Kashmir Rifles, •
the 3rd
King’s African Rifles, •
the
East African Mounted Rifles (a white settler unit), •
the
King’s African Rifles Mounted Infantry, •
a
machine gun section of the 129th Baluchis, •
the 7th
Field Battery (four 15-pounder ox-drawn guns manned by Royal Garrison Artillery
personnel, mainly from Mauritius), •
the
27th (Bengal) Mountain Battery,(less 1 section of two guns).
At the south-western end of the Uluguru
Mountains a large enemy supply dump had been established at Kisaki. The Germans were busy shifting the stores
from this dump further southwards, using vast gangs of African villagers that
were conscripted through the local tribal chiefs. Objections to such conscription were not
raised as objectors were hung. General
Smuts planned another encircling action to capture the dump and all the enemy
units north of the Mgeta River. Again all British forces advanced concurrently.
The South African units on the western
flanks of the mountains ran into strongly held and well-sited defences and lost
many men. Meanwhile in the central
mountains and on the eastern flank the British units advanced steadily against
German rear-guard actions, but were hampered by difficult terrain and enemy
demolitions, particularly of bridges over fast-flowing rivers. A new road had to be blasted through the
hills to get the British heavy artillery forward. The infantrymen at the vanguard of the
British advance were receiving incoming shells from large enemy guns, including
one from the Konigsberg, but the
British mountain and field guns with the vanguard did not have the range to
reply to the Germans. Meanwhile at the
south-eastern end of the mountains some of von Lettow’s men dug themselves into
a sound defensive position at a village named Nkessa’s (after the local African
chief), and they waited for the British to arrive.
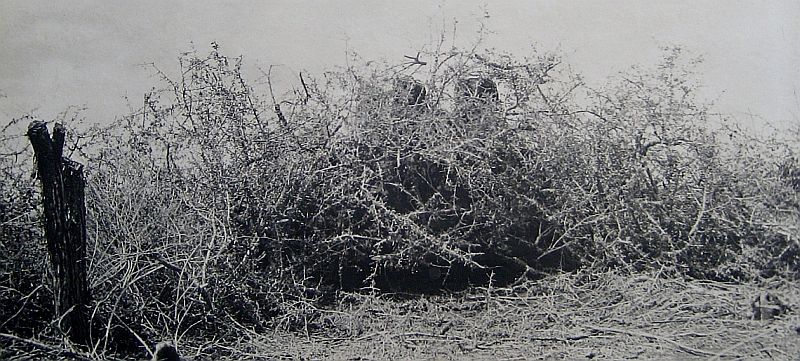
Above: LNL MG Coy camouflaged gun position - rear view
The
action on the Dutumi River, 10th – 12th September 1916
Entrenched at Nkessa’s was an enlarged
Abteilung Stemmerman now containing the 3rd, 14th, 18th
and 22nd Field Companies plus the 4th Schutzen
Company. Captain Paul Stemmermann was
one of von Lettow’s most able formation commanders. A road ran from Tulo to Kisaki through
Nkessa’s, down which the British 1st Division advanced. Stemmerman’s men defended the low ground
south of the road with detachments holding a ridge of high ground to the north
of the road. Abteilungen (formations)
Schulz and von Liebermann were poised ready to counterattack in support of
Stemmermann. To the west other Abteilungen
were punishing South African attempts to seize Kisaki.
On 10th September 1916 2nd
East African Brigade led the divisional advance, with the 3rd Kashmiri Rifles
acting as vanguard. When Stemmermann’s outposts were bumped at 1000 hours, and
the scale of the defence appreciated, the 57th Wilde’s Rifles and a
section of the 27th (Bengal) Mountain Battery were sent
right-flanking to seize the high ground named Kitoho Hill. The sepoys and gunners achieved this task by
noon and were followed by the 3rd King’s African Rifles (3 KAR)
which was tasked with turning the enemy right flank; by nightfall the KAR
Askaris had found a small tributary of the Dutumi that provided the water that
the battalion badly needed.
Meanwhile down on the plain below the LNL
MG Coy had come into action to support the Kashmiris. The Kashmiris advanced north of the road and
the LNL machine gunners advanced south of it, both units being supported by the
Bengali mountain gunners; however movement and visibility were both hampered by
long grass and sugar cane plantations.
As dusk fell the British advance was halted about 460 metres from
Stemmermann’s main position.
At dawn on 11th September 3
KAR pushed forward, crossed the Dutumi River and advanced two companies down
the west bank. Abteilung von Liebermann
then counter-attacked 3 KAR and drove the advancing companies backwards. To give the machine guns the chance to
exploit their range effectively half of the LNL MG Coy had been moved up the
slopes of Kitoho Hill and dug into good fire positions. These machine gunners on the slopes of Kitoho
Hill probably could not engage the counter-attacking enemy across the river
because of the dense bush that blocked observation. Von Liebermann’s Abteilung specialised in
counter-attacks, and it was not halted.
During this day the 5th South
African Field Battery got through the pass that British pioneers had carved out
of the Nguru Mountains, and the battery came into action east of Nkessa’s. The Gold Coast Regiment was brought forward
and whilst two companies went right-flanking to support 3 KAR the remainder
moved forward on the British left and engaged Stemmermann’s trenches. By 1700 hours the Germans were still
controlling the battlefield and von Lettow himself was in charge, with a total
of around 2,200 men and 24 machine guns opposing the 1st East African Division.
Left: German position on the Mgeta River
British scouts reported at dawn on 12th
September that most of the German defences north of the road had been
abandoned, and the 57th Wilde’s rifles moved swiftly downhill to
link up with the Kashmiris and confront an enemy position close to Nkessa’s
village. To the west 3 KAR and the two
Gold Coast companies advanced again across very difficult ground down the enemy
side of the river. The Gold Coasters on
the plain and the LNL machine gunners attacked Stemmermann, but he gave no
ground away and stood firm, causing many Gold Coast casualties. Around 1700 hours Stemmermann put in a
counter-attack on the Gold Coasters’ left flank, but both sides were severely
hampered by the thick bush, and the German attack petered out. However the LNL machine gunners on Kitoho
Hill had seized the opportunity to engage the Germans, now that they were out
of their trenches, with effective enfilade fire. And so a day of confused fighting around
Nkessa’s ended, with the troops of both sides exhausted, dehydrated and
hungry. British 1st Division
battle casualties so far were around 90 all ranks whilst German figures suggest
15 to 20 men killed, wounded or missing.
During the night the Germans made their
usual clean break out of the battlefield, withdrawing south of the Mgeta
River. Yet another British encircling
manoeuvre had failed because of superior German battlefield skills,
particularly in the selection and temporary defence of excellent positions, and
also in the application of thorough Battle Procedure drills that resulted in
orderly night-time withdrawals involving the minimum loss of men, equipment and
supplies. But what should also not be
omitted is that the Germans were fighting on and for their own territory, and
they and their Askari were men who enjoyed fighting fiercely and
professionally.
The
end of the first Loyal North Lancashire Machine Gun Company.
The British troops were exhausted and as
usual under-supplied, and heavy rains started to fall. Operations on the Mgeta River ground to a
halt with the British holding the north bank and the Germans the south
bank. 3 KAR mounted a short cross-river
operation and then withdrew. Most of the
South African troops would soon be withdrawn to the healthier climate of their
homeland. General Smuts looked to
initiatives elsewhere, such as landings on the southern German East African
coastline. But he also was soon to
depart for a far more pleasant posting in London where he would claim the
honours for seizing most of the enemy territory. Von Lettow and his Schutztruppe sat tight,
planted and harvested food crops, and laid down a series of stores dumps that
they would use in 1917 as they fought a withdrawal southwards. Despite General Smuts’ future claims about
the seizure of territory, the Schutztruppe was still a potent unbeaten army,
and it would remain so until after the Armistice had been declared in Europe.
Above: LNL MG Coy camouflaged gun position - front view
The Loyal North Lancashire Machine Gun
Company was now reduced by sickness to a strength of five officers and less
than 30 Non Commissioned Officers and men.
The company, wearing rags for clothing, was ordered to march back to
Morogoro; doubtless friendly Army Service Corps drivers with empty trucks
provided lifts when that was possible.
From Morogoro the company was instructed to make its way back to the 2nd
Battalion The Loyal North Lancashire Regiment, now stationed near Kilwa after
returning from three months rest and rehabilitation in South Africa. Kilwa was on the Indian Ocean coast south of
Dar Es Salaam. Mechanical transport was
not supplied and the company, whose numbers still decreased weekly through
medical evacuations caused by disease and debilitation, was told to march on an
old slave-traders’ route through the bush to Dar Es Salaam. The company strength was now:
•
5
officers •
20
other ranks •
35
mules carrying the guns •
100
1st Line porters carrying ammunition and stores •
A
group of 2nd Line porters carrying 8 days-worth of rations.
The route covered 200 kilometres and the
company arrived at Dar Es Salaam on the morning of the eighth day. Here a medical board found three officers
(Major R.E. Berkeley and Lieutenants J.E. Bowden and W. Halton) and 17 rank and
file fit to proceed by ship to Kilwa.
These survivors proceeded to join their battalion which had been ordered
to move to Egypt, as the three months rehabilitation in South Africa had not
prevented high incidences of malaria occurring again within the battalion’s
ranks.
But the 2LNL battalion commander,
Lieutenant C.E.A. Jourdain DSO, had been ordered to leave all fit men
behind to serve in a second Loyal North Lancashire Machine Gun Company that was
to be formed around the nucleus of the 20 survivors of the first company. And so this saga will be extended, and
further articles will follow.
Footnote
The use of British infantry soldiers as specialist machine gunners in East Africa
was undoubtedly more profitable than just employing them as riflemen – a task
that African Askari could perform more satisfactorily. But General Jan Smuts’ tactical limitations
(he had been an outstanding guerrilla leader 15 years previously, but had been
a politician since then) led to the British having few battles with the
professionally superior German force led by Colonel Paul von
Lettow-Vorbeck. Apart from the rare
British success at Lukigura the fighting was done on ground chosen by the
German defenders, and they then dominated their British opponents.
Interestingly the commander of the successful
outflanking movement at Lukigura was General Hoskins, an officer with East
African experience. Hoskins was to take
over from Smuts as theatre commander but not for long, as from his London
power-base Smuts was to be instrumental in getting Hoskins dismissed and posted
to Mesopotamia, whilst another South African General, Jacob Louis van Deventer,
was recalled from his farm and appointed to command the East African
theatre. Hoskins’ problem was that in
order to resolve the logistical shambles that Smuts had left behind, he
requested too much support from London, and that doomed him. But without any doubt, Smuts’ dismissal of
logistics as a military requirement put many of the Loyal North Lancashire
machine gunners into hospital with disease caused by debilitation, and some of
those lads did not come out of hospital
alive.
A hand-written poem, composed by a white
soldier, has survived. It displays the frustrations of a man perhaps unable to
get rid of dysentery, fevers or other tropical ailments:
TULO
(or any other camp in this blasted country) Dawn on the Ulunguru Hills! Dawn on Mvuha Plain!! And lost, damned
souls in Tulo Camp are awaking to life again; To the hopelessness and the
helplessness of the weary, dreary day,
To the consciousness of their wretchedness fretting their lives away.
In Tulo, under the Uluguru Hills.Noon on the Uluguru Hills, Noon and the sky is
aflame, And the
camp lies bare to the blinding sun, in its nakedness and its shame,
In its ghastliness, and its nastiness, the swarming flies and the
stench. The squalid hut, and the rotting horse, and the filth in the open
trench.
In Tulo, under the Uluguru
Hills.Night on the Uluguru Hills. Night on Mvuha Plain. And the lost
damned souls in Tulo camp are fretting in sleep again, All the weariness and the dreariness,
of this helpless, hopeless plight.
While lion creep through the sleeping camp, the death that stalks by
night.
In Tulo,
under the Ulunguru Hills.
SOURCES:
•
Official History. Military Operations
East Africa, Volume I, August 1914 – September 1916 compiled by Lieutenant Colonel Charles
Hordern. •
Extracts from the draft Volume II of
Official History. Military Operations East Africa held in the UK National Archives. •
The Loyal North Lancashire Regiment
1914-1919 by Colonel
H.C. Wylly CB. •
War Diaries of 2nd Bn The
Loyal North Lancashire Regiment, 25th Bn The Royal Fusiliers
(Frontiersmen) and The Mounted Infantry Company. •
I Can Never Say Enough About the
Men. A History of the Jammu and Kashmir
Rifles throughout their World War One East Africa Campaign by Andrew Kerr. •
British Intelligence Supplement No 7
(East Africa) dated
October 1916. •
The London Gazette and Medal
Index Cards. •
Documents in the archives of the Queen's
Lancashire Regiment Musuem at Preston, UK.
Photographs of the machine gunners of the
2nd Bn The Loyal North Lancashire Regiment were kindly provided by
the copyright holder The Queen’s Lancashire Regiment Museum, Preston, UK.

 The
advance to the Lukigura River
The
advance to the Lukigura River
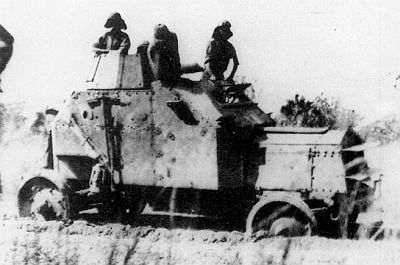 Left: A British armoured car in East Africa
 The
fight at the Wami River, 17th August 1916
The
fight at the Wami River, 17th August 1916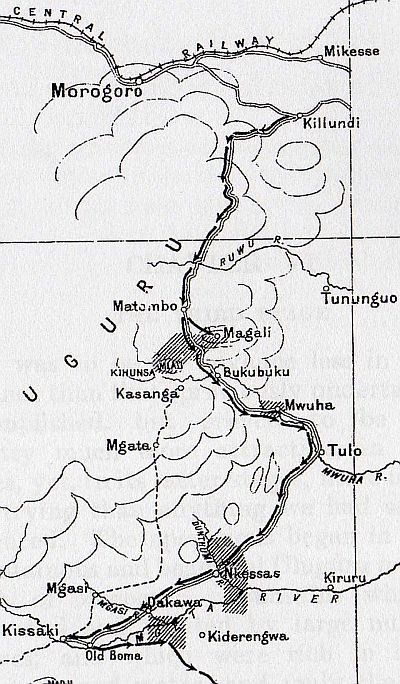 The
advance towards the Mgeta River
The
advance towards the Mgeta River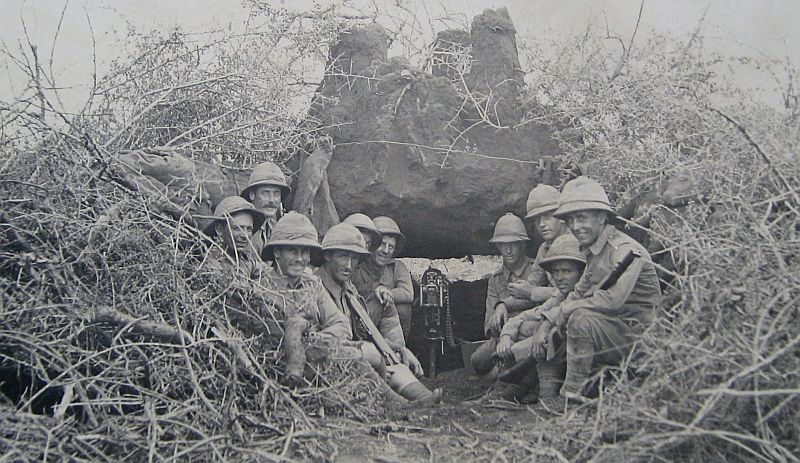
 Left: German position on the Mgeta River